We are using WinTrans 9.3, which appears not to be available for download anymore. If you already have WinTrans, you don't need to do anything in this step. If you don't, it may be best to ask one of the developers for a copy of the 9.3 installer. You can also try 9.4, which may well also work fine - available here:
When asked, enter the following licence key: RWTTRA-810548-000511
Once you get the list of download choices, select the first one: RC-WinTran 9.3 Translator's Edition
You will be asked again for the licence key when you install.
The translation project and other required files are packaged as a zip file. Unzip the file you have been given into an empty folder. You should have a folder named "bin" and a ".fsmdb" file - for example PhotomatixEssentials40.fsmdb.
The bin folder contains the parts of Photomatix Essentials and its libraries that are needed for localisation purposes.
You should now be ready to start up RC-WinTrans.
The first thing you will need to do is to tell it where to find the parts of the Photomatix application that you downloaded. Note that you need to do this only once.
Select Tools -> Options, then click on the ".NET" tab. If the Compoent Reference Directories list is not empty, click on each folder listed there, and click "Remove". Now click on the "Add..." button, browse to the "bin" folder you extracted and click OK, and then OK again to close the Options window. Restart WinTrans if it requests you do so.
Now, to open the project, select File -> Open -> Translation Project from the menu, and open the .fsmdb file you extracted earlier.
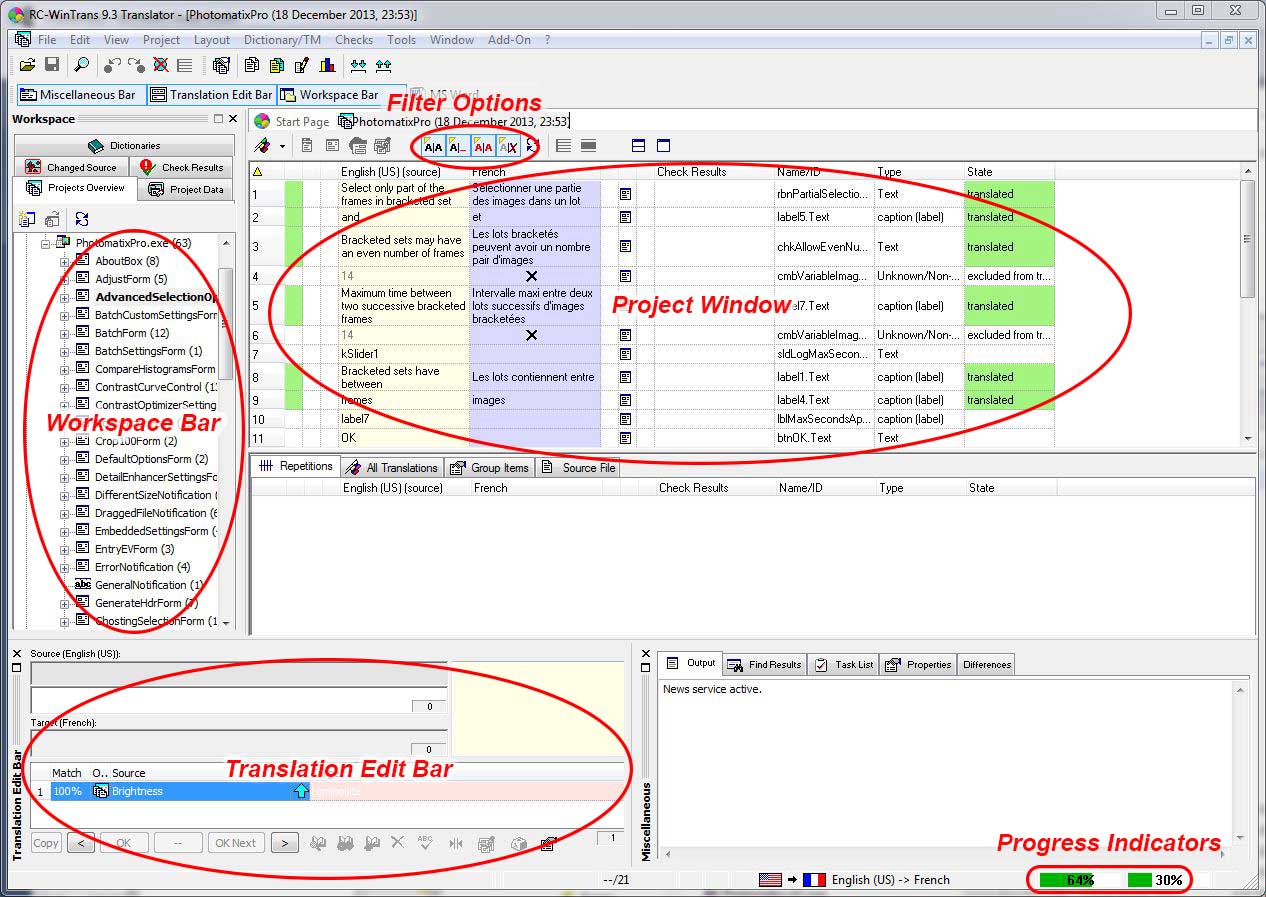
Shown below are the important parts of RC-WinTrans, which we'll refer to as we go through.

To the left of the screen is the Workspace Bar, which allows you to select the form or control you want to translate. You'll start off with an entry showing the project name - for example "PhotomatixEssentials Fr (10 January 2014)". Double-click on this to open the project. You should now see one entry underneath the project name: PhotomatixEssentials.exe. Double-click on the this to see all the forms that need translation.
Click on a form name, and in the Project window you should see the list of translatable items, with the English text and next to it a purple columns with the current translation, if there is one. The "State" column on the far right shows the status of the item:
In the toolbar above the Project window, there are four icons which allow you to filter the items you will see in the list:
Click on them to show or hide items in each category. You'll probably want to hide items excluded from translation.
One way to change the text is just to double-click on the translated text column and edit the text. You can also edit the text in the Translation Edit Bar, and click OK to confirm the change. Use the "<" and ">" buttons to move between untranslated entries.
Notice the "Repetitions" tab below the main translation list in the Project window. If the text to be translated also occurs in some other place (e.g. in some other form or control), this will show all the occurrences of the text (including the one you are editing).
You can use the same translation for all of them by entering the translation for one of them in the Translation Editor Bar, then clicking ok the "OK (n)" button. The text of the button changes depending on how many items this translation will apply to (e.g. OK (2)).
Notice the Progress Indicators in the Status Bar, at the bottom-right of the main Rc-WinTrans window. These give you a visual indication of the percentage of translated (green), non-translated (white) and changed source (red) items. The leftmost indicator shows the status of the currently viewed item (e.g. a form you are translating) whereas the rightmost one shows the statistics for the whole project.
If you need to see where one of the listed text strings occurs in the control or form, to help you determine the proper context for a word or phrase, you can use the Forms Editor.
To use this, click on the name of the control or form you want to edit in the Workspace list, and then right-click on it (you need to do both), and select "Open External .NET Forms Editor". This brings up two copies of the form. The leftmost one, which is labelled the Target, has the translated text in it, and the one on the right is the Source - the original English version.In the middle is a properties window similar to what ResXEditor offers. To see where some text in the Project Window appears in the form, first make a note of the value in the "Name/ID" column for the text you are interested in. The first part of this, before the first ".", is the name of the control the text appears in. Above the properties window of the Forms Editor, there is a dropdown list with all the control names in it. Choose the control name from this list. The control should then be highlighted with several small squares appearing around it.
Note that not all forms will display correctly in this editor. Some control sizes, positions or fonts may not be correct, and not all controls show at all, especially with the PreviewForm. This is due to poor support of WinTrans for the libraries we are using. However remember that you do not need to resize or move any controls. You are using the Forms Editor only to see where particular text appears.