1 | 2 | 3 | 4 | 5 | 6 | 7 | 8 | 9 | 10 | 11 | 12 | 13 | 14 | 15 | 16 | 17 | 18 | 19 | 20 | 21 | 22 | 23 | 24 | 25 | 26 | 27 | 28 | 29 | 30 | 31 | 32 | 33 | 34 | 35 | 36 | 37 | 38 | 39 | 40 | 41 | 42 | 43
View as: AV Script | Scenelist | Voice-Over/Presenter Script Hide/Show (experimental): Images | Visual | Audio | Sceneheader | Shot | Signs
INT. = Interior, LS = Long Shot, MLS = Medium Long Shot, MS = Mid Shot, MCU = Medium Close Up/Close Shot, CU = Close Up, ECU = Extreme Close Up/Detail
1

INT. PHOTOMATIX STUDIO - DAY
MID SHOT OF PHOTOGRAPHER
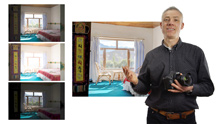
Photographer in his studio, a TV set next to him on the left shows a photo of the living room.
ZOOM IN TO:
IN FRAME w/ camera
Today we'll be talking about a technique for taking real estate photos of rooms with a view.
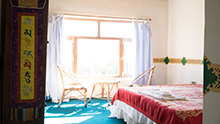
We're going to use this living room as an example.
2
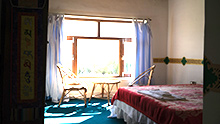
INT. ROOM - DAY - INTRODUCING THE TASK
LONG SHOT OF ROOM
Show the room in a LONG SHOT (i.e. sufficiently wide angle to see a large part of it) with the window(s) open (i.e, not covered by shutters, blinds or curtains) and taken at the default exposure
ZOOM IN TO:
OFF-SCREEN
This is a nice room and the view is attractive too, can you see it?
3
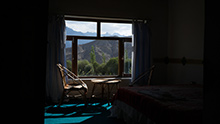
INT. ROOM - DAY - SPOTTING THE PROBLEM
MEDIUM LONG SHOT OF THE WINDOW
Gradually zoom in on the main window, though still not a complete close-up on it (i.e. part of the rest of the room still showing)
OFF-SCREEN
No you can't!
The video camera just can't show it with the default exposure.
The brightness difference between the room and the window is just too large to show everything in one exposure.
4
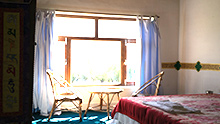
INT. ROOM - DAY - EXPOSING FOR THE WINDOW
MEDIUM LONG SHOT OF THE WINDOW
Change the video camera's exposure until the view out of the window can be seen well
ZOOM OUT TO:
OFF-SCREEN
Now that I've changed the video camera's exposure, you can see the view!
But you can't see the rest of the room anymore
5
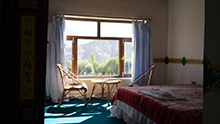
INT. ROOM - DAY - BACK TO NORMAL EXPOSURE
LONG SHOT OF ROOM
Back to default exposure and LONG SHOT view as in 2
OFF-SCREEN
You can see the room's interior again now, but it still looks a bit dark
6
INT. ROOM - DAY - EXPOSING FOR THE ROOM
LONG SHOT OF ROOM
Change the video camera's exposure until the interior looks "pleasantly" bright
OFF-SCREEN
I need to change the exposure again to make it look better
And this doesn't just affect this video. We have exactly the same problem when taking a photo of the room.
IN FRAME w/ camera
So, what's the solution? You guessed it: Combining exposures! And this is what I'm going to show you
7

TITLE 'EQUIPMENT' - INTRODUCING REQUIRED EQUIPMENT
TITLE 'EQUIPMENT'
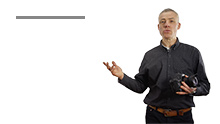
Screen containing the heading "Equipment"
IN FRAME w/ camera
Pause a little bit
To start with, let's talk about the equipment
8

TITLE 'EQUIPMENT' - #1 CAMERA
LIST ITEM #1 'CAMERA'/IMAGE OF A CAMERA
Same screen as above with a "1" item listed below the heading, and an animation adding the picture of a camera symbol next to it
OFF-SCREEN
First you need a camera. But you already know that of course
If your camera includes an Automatic Exposure Bracketing function, then this will certainly help.
Most DSLR's and mirrorless cameras offer Automatic Exposure Bracketing, and some compact cameras do as well
9

TITLE 'EQUIPMENT' - #2 TRIPOD
LIST ITEM #2 'TRIPOD'/SYMBOL OF A TRIPOD
Same screen as above with a "2" item listed below the camera, and with an animation adding the picture of a tripod symbol next to it
OFF-SCREEN
If your camera doesn't offer Automatic Exposure Bracketing, then you will need to use a tripod, and change the exposure manually.
If your camera does offer Automatic Exposure Bracketing, but with a limited number or EV range, then you may need a tripod as well.
10
TITLE 'EQUIPMENT' - TRIPOD NOT NEEDED
LIST ITEM #2 'TRIPOD'/SYMBOL OF A TRIPOD
Same screen as above with an animation removing the picture of the tripod
Note: If the EV range is wide, given no additional lighting, it is likely that at least the longest exposure exceeds the shutter speed a photographer can hold without causing camera shake. So I would recommend to mention this.
GJ comment: I would find it better to mention that it is a good idea to switch all available lighting on to reduce the DR a bit
OFF-SCREEN
If your camera offers Automatic Exposure Bracketing with a large EV range, you may be lucky and not need a tripod at all.
11

TITLE 'TAKING THE EXPOSURES' ITEM #1
'TAKING THE EXPOSURES'
Screen containing the heading "Taking the exposures"
MCU of PHOTOGRAPHER
PHOTOGRAPHER speaks to the audiance
ITEM #1 '1. SET ISO AND APERTURE PRIORITY MODE'
Then, an animation adds "1. Set ISO and Aperture Priority mode"
IN FRAME w/o camera
Now let's get to the meat of the matter, and learn how to set your camera to take the exposures
12
INT. ROOM - DAY - SETTING CAMERA'S ISO
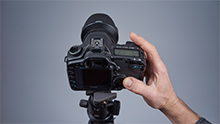
MCU OF CAMERA
Show PHOTOGRAPHER's camera and how he sets the ISO
OFF-SCREEN
To adjust the exposure, you will change only the Shutter Speed. The ISO and Aperture will remain the same for each shot.
Set the ISO as low as possible. This will help keeping noise to a minimum.
13
INT. ROOM - DAY - SETTING CAMERA TO APERTURE PRIORITY
MCU OF CAMERA
PHOTOGRAPHER's camera and how he sets it to Aperture Priority
Note: This could be the right moment for a mention to disable Auto Focus and Auto White Balance.
GJ comment: There are already a lot of things to remember for the person who watches this video, so I am a bit concerned that adding this might increase the chance of forgetting about the Aperture Priority. I would suggest to put this mention in our html tutorial instead.
OFF-SCREEN
Set the camera to Aperture Priority mode
14
TITLE 'TAKING THE EXPOSURES' ITEM #2
ITEM #2 '2. SPOT METERING'
Same screen as 10, with a "2. Spot metering" item added
OFF-SCREEN
We're now going to measure the exposures required for the darkest and brightest parts of the room
15
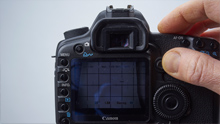
INT. ROOM - DAY - SETTING CAMERA TO SPOT METERING MODE
MCU OF CAMERA DISPLAY
PHOTOGRAPHER's camera and how he sets it to spot metering mode
OFF-SCREEN
To do that, switch your camera to spot metering mode
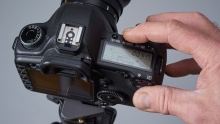
16
INT. ROOM - DAY - METERING THE DARKEST SPOT
MCU OF PHOTOGRAPHER AIMING HIS CAMERA
PHOTOGRAPHPER aiming his camera to the dark area, followed by Live View of the camera with OSD (On-Screen Display) showing the dark part of the interior and its shutter speed reading
NOTE: Moving the metering point doesn't work with my cameras, neither with my Canon nor with my Sony. I can set Spotmetering Mode, but the spot is fixed in the middle.
GJ comment: I haven't understood the purpose of the above comment, but maybe Matthew will and will adjust the voice over accordingly
OFF-SCREEN
First, aim the spot metering area at the darkest part of the room, and read the shutter speed.
It reads 2 seconds.
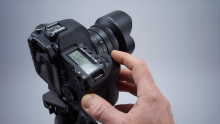
17
INT. ROOM - DAY - METERING THE BRIGHTEST SPOT
MCU OF PHOTOGRAPHER AIMING HIS CAMERA
PHOTOGRAPHPER aiming his camera to the window, followed by Live View of the camera with OSD (On-Screen Display) showing the window and its shutter speed reading
NOTE: Moving the metering point doesn't work with my cameras, neither with my Canon nor with my Sony. I can set Spotmetering Mode, but the spot is fixed in the middle.
OFF-SCREEN
Then, go next to the window and aim the spot metering area at the brightest part of the view, and read the shutter speed.
It reads 1/250th of a second.
18
INT. ROOM - DAY - METERING CONCLUSION
LONG SHOT OF ROOM
Room at default exposure and LONG SHOT view as in 2
OFF-SCREEN
You have now measured the exposures at both extremes.
However, the difference in brightness between the interior and the windows is very large, so you'll need to take intermediary exposures to get a "smooth" combined image.
Taking intermediary exposures is easy if your camera offers Automatic Exposure Bracketing. However, it requires a bit of math to calculate the shutter speed for each bracketed set.
19

TITLE 'TAKING THE EXPOSURES' ITEM #3
ITEM #3 '3. HDR EXPOSURE CALCULATOR HTTP://HDRSOFT.COM/EV'
Same screen as 11, with a "3. HDR Exposure Calculator" item added and below it "www.hdrsoft.com/ev" and presented it in a way that gives it a good visibility
OFF-SCREEN
If you are like me and don't want to do the math, use the free online tool called HDR Exposure Calculator
20
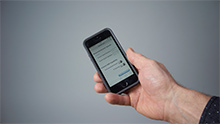
INT. ROOM - DAY - RUN HDR EXPOSURE CALCULATOR
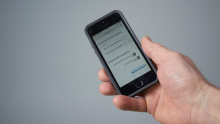
MCU OF IPHONE
PHOTOGRAPHER's iPhone and how he enters hdrsoft.com/ev in Safari
OFF-SCREEN
You can access the tool by typing hdrsoft dot com slash ev in your browser
21
INT. ROOM - DAY - ENTER SHUTTER SPEED FOR DARKEST EXPOSURE
ECU OF IPHONE
Show the HDR Exposure Calculator and how PHOTOGRAPHER enters 3
OFF-SCREEN
The exposure measured for the darkest part of this room is 2 seconds. So I enter 2 in the first field
22
INT. ROOM - DAY - ENTER SHUTTER SPEED FOR BRIGHTEST EXPOSURE
ECU OF IPHONE
Show the HDR Exposure Calculator and how PHOTOGRAPHER enters 1/250
OFF-SCREEN
The exposure measured for the window is 1/250th second. So, I enter one slash two-hundred-fifty in the second field
23
INT. ROOM - DAY - ENTER NUMBER OF FRAMES
ECU OF IPHONE
Show how PHOTOGRAPHER does that
OFF-SCREEN
As my camera can take up to 3 bracketed frames, I leave the Auto-bracketed Frames selection to 3
The maximum number of auto-bracketed frames depends on your camera model.
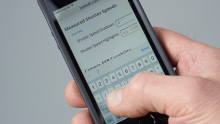
24
INT. ROOM - DAY - GET EXPOSURES
ECU OF IPHONE
PHOTOGRAPHER taps on "Get Exposures"
OFF-SCREEN
As my camera can bracket exposures spaced by 2 EV, I leave the EV Spacing selection unchanged.
The maximum EV spacing depends on your camera model. It is often 2 EV on Canon camera models, and 1 EV on Nikon cameras.
You can now tap on "Get Exposures".
25
INT. ROOM - DAY - RESULTS IN HDR EXP. CALC.
MCU OF IPHONE
Show the results generated by the HDR Exposure Calculator.
Note: The sequences below assume that PHOTOGRAPHER's camera can take 5 bracketed exposures spaced by 2 EV, AND that the measured shutter speeds only require one bracketed set of 5 photos at 2EV according to the HDR Exposure Calculator. If this assumption isn't possible, then the script will have to be adjusted accordingly.
Note 2: Actually the 5D MK II can only take 3 photos at 2 EV. However I usually use Magic Lantern to overcome this restriction. I don't think it is a good idea to mention Magic Lantern, but I could use it without a mention. What do you think? The other option could be to rent a 6D, which can do 7 photos at 2 EV.
GJ comment: Let's not complicate things, as the video already introduces many things that aren't so easy to grasp for the intended audience. So, just adjust the script for 3 frames. This is in fact better, as few people will have access to a camera that can take in one bracketed set the range given by 5 frames at 2 EV.
OFF-SCREEN
The Calculator tells me that I need to take two bracketed sets. The first with shutter speed 1"3.
26
INT. ROOM - DAY - SETTING UP THE CAMERA
MCU OF CAMERA
PHOTOGRAPHER's camera and how he sets the dial to M 'Manual Mode'
OFF-SCREEN
To use Automatic Exposure Bracketing, switch the camera to Manual Mode first
27
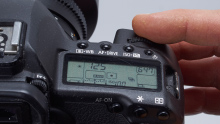
INT. ROOM - DAY - SETTING TO NORMAL EXPOSURE
ECU OF CAMERA
PHOTOGRAPHER's camera and how he sets normal exposure
OFF-SCREEN
Set the Shutter Speed, as given by the HDR Exposure Calculator. The first one is 1"3
28
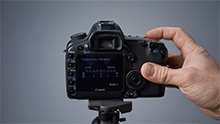
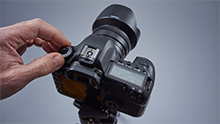
INT. ROOM - DAY - SETTING UP AEB
ECU OF CAMERA'S MENU
PHOTOGRAPHER's camera and how he sets AEB in the menu
OFF-SCREEN
Now set your camera to Auto Exposure Bracketing
29
INT. ROOM - DAY - SETTING UP EV SPACING
ECU OF CAMERA'S MENU
Show PHOTOGRAPHER's camera and how he does that
OFF-SCREEN
Set the EV spacing to +/- 2 EV if your camera supports it, or else to the highest EV spacing it supports.
With this Canon camera, I set AEB from the third menu screen, choosing Exposure Compensation/AEB. Then I turn the dial to the right until both red markers reach 2 EV
Consult your camera's user manual for the correct instructions on setting Automatic Exposure Bracketing for your camera model.
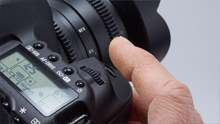
30
INT. ROOM - DAY - SETTING UP CONTINIOUS SHOOTING
ECU OF CAMERA'S UPPER DISPLAY
Show PHOTOGRAPHER's camera and how he sets up Continuous Shooting
OFF-SCREEN 30A
Lastly, set the shooting mode to Self-Timer.
OFF-SCREEN 30B
Lastly, select Continuous Shooting mode.
31
INT. ROOM - DAY
ECU OF CAMERA'S SHUTTER RELEASE
OFF-SCREEN
Everything is set up now, and you just need to press the shutter button
But this is if you are lucky and your camera can take all exposures in just one bracketed set
With my camera, I need to take two bracketed sets to capture this scene.
33
INT. ROOM - DAY
MCU OF PHOTOGRAPHER WITH CAMERA ON A TRIPOD
PHOTOGRAPHER's camera on a tripod and how he sets and shoots the two bracketed sets
ECU OF CAMERA'S SHUTTER RELEASE
PHOTOGRAPHER's camera and that he presses the shutter button
OFF-SCREEN
This means I need to use a tripod to shoot the first bracketed set.
Let's shoot the first set now.
(Click sound from camera)
I now change to the 2nd shutter speed given by the calculator, then press the shutter button again.
(Click sound from camera)
IN FRAME(?) w/ camera at desk
That was it!
34

INT. PHOTOMATIX STUDIO - DAY
MCU OF PHOTOGRAPHER AT HIS DESK
CU OF THE SD/CF CARD INSERTED IN THE READER
Show PHOTOGRAPHER's computer (Windows OS) and that he is inserting the CF/SD into computer's drive
Then show PHOTOGRAPHER's computer screen and that he opens Photomatix Pro
IN FRAME
You have now taken the exposures necessary to capture both the interior and the view
The rest is easy. Transfer the photos to your computer, and let Photomatix do its magic
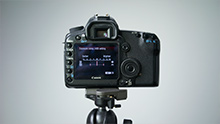
35
INT. PHOTOMATIX PRO INTERFACE
PHOTOMATIX PRO LOADING IMAGES
Show Photomatix Pro, zoom in on the Workflow Shortcuts, show that PHOTOGRAPHER clicks on 'Load Bracketed Photos', browses to the photos and clicks 'OK'
OFF-SCREEN
If you shot in both JPEG and RAW, then load the JPEG photos. They will produce more pleasant images when we fuse the photos.
36
INT. PHOTOMATIX PRO INTERFACE
SETTING THE MERGE OPTIONS
Show the Merge to HDR Options dialog, that PHOTOGRAPHER clicks on the Merge button and briefly show the progress bar (less than 1 sec)
OFF-SCREEN
Check the alignment option, even if you used a tripod
Don't check the deghosting option
If you loaded RAW files, then check the option to reduce noise
37
INT. PHOTOMATIX PRO INTERFACE
ADJUST AND PREVIEW > CHOOSING A PRESET
Show the tonemapping/fusion windows with the Default preset selected and with the thumbnails listed on two columns
Zoom in on the preset panel and show that PHOTOGRAPHER selects the Architecture category
Choose the Interior 2 preset and zoom out so that the preview shows
OFF-SCREEN
Here is the merged HDR image. To find presets for real estate photos, click the combo-box on top of the thumbnails list and select Architecture.
The Interior preset is particularly good at rendering the view out of the window while keeping a natural look.
However, if you use Photomatix with photos taken outside, then use the preset named Natural instead. The Interior preset doesn't work well for exterior shots.
38
INT. PHOTOMATIX PRO INTERFACE
ADJUST & PREVIEW > ADJUST BRIGHTNESS
Zoom in on the Settings panel and change the Brightness slider, and/or the Saturation one, then zoom out so that the preview shows again
OFF-SCREEN
Once you've found a preset you like, you can use the settings on the left to adjust the image
39
INT. PHOTOMATIX PRO INTERFACE
ADJUST & PREVIEW > RENDERING RESULT
Zoom in on the Apply button, show that PHOTOGRAPHER clicks on it, then show the progress bar (around 1 sec) and then the final image with Finishing Touch panel.
OFF-SCREEN
When you are satisfied with your image, click on the Apply button on the bottom left
40
INT. PHOTOMATIX PRO INTERFACE
FINISHING TOUCH
Zoom in on the Finishing Touch panel, click on Sharpen and choose "Mild"
OFF-SCREEN
You can use the Finishing Touch panel to add contrast or sharpening
41

INT. PHOTOMATIX PRO INTERFACE
SAVING THE IMAGE
Show that PHOTOGRAPHER clicks on "Save Image" and that he saves the image
OFF-SCREEN
Click on the "Save Image" button to save your image
42
INT. BROWSER
SHOWING HDRSOFT.COM AND DOWNLOAD PHOTOMATIX PRO
Show the HDRsoft.com homepage, then that PHOTOGRAPHER clicks on Download, then on "More Info & Download", then on the download link and that it gets downloaded.
OFF-SCREEN
If you haven't tried Photomatix Pro yet, you can download it from HDRsoft dot com
IN FRAME(?)
The trial is fully functional and doesn't expire. A watermark is added to the final image when Photomatix is in trial mode
43

INT. PHOTOMATIX STUDIO - DAY
MID SHOT OF PHOTOGRAPHER AT DESK
Photographer in his studio like in 1, a desk with a notebook / monitor. He is looking up from his screen.
IN FRAME simply him in his studio
Thank you for watching!